SEO using Isomorphic application with Relay and Helmet
Introduction
In this article we will review an approach for implementing SEO-friendly pages using an isomorphic Single Page Application (SPA), utilizing React, Relay and React Helmet.
As it is described in Isomorphic React Relay, isomorphic applications solve two of the biggest issues associated with SPAs:
- When a search engine attempts to access a page in the application, the rendering of the HTML will be performed on the server, and the result will be returned to the search engine. The search engine will be able to read all the information contained in the <title>, <meta>, <h1>, <h2> tags as well as the body of the page.
- When a user opens the first page in the SPA, for instance when following a link from a different site or an email, the server would render all the HTML on the server, and send it back together with the JavaScript required to run the application. The HTML will load first and the user will be given a chance to inspect the information on the screen, while the code of the SPA is downloading in the background. Once the download is finished, the user can continue to operate the application like a regular SPA enjoying all of its advantages.
In this article we will focus on the first advantage and follow the steps for SEO-enabling a React Relay SPA. The example is based on the Universal Relay Boilerplate which provides all the basic boilerplate we will need.
The SEO friendly content will be an instance of an essay stored in an Ensayo class with the following fields:
- Title - used for the title tag in the page header and displayed as title in the content.
- Keywords - used to populate the meta description tag.
- Content - content of the essay in plain text.
Ensayo model in GraphQL
In GraphQL all entities that are presented to the outside world are defined as object types. When working with the GraphQL.js reference implementation, the object types are defined as JavaScript objects. Each object type consists of fields with scalar types. The basic scalar types in GraphQL are listed below, although it is possible to add custom ones (for instance for date/time):
- GraphQLInt
- GraphQLFloat
- GraphQLString
- GraphQLBoolean
- GraphQLID
The Ensayo object type is defined as follows:
export default new GraphQLObjectType( {
  name: 'Ensayo',
  interfaces: [NodeInterface],
  isTypeOf: object => object instanceof Ensayo,
  fields: {
    id: globalIdField('Ensayo'),
    Ensayo_Title: { type: GraphQLString, resolve: (obj) => obj.Ensayo_Title },
    Ensayo_Description: { type: GraphQLString, resolve: (obj) => obj.Ensayo_Description },
    Ensayo_Content: { type: GraphQLString, resolve: (obj) => obj.Ensayo_Content },
  },
} );
The three fields of the essay are defined as string type fields. A unique id is also available, a requirement for GraphQL and Relay. The resolve function of the fields defines a function which retrieves the values of the fields. They can be simply mapped to properties of the underlying JavaScript object, or calculated.
Once the JavaScript definition of the object types is complete, a build step needs to be run to produce the schema in format used by Relay, and a human readable format. In IMRSK the step can be executed by running:
$yarn build-schema
The step takes the definitions in JavaScript as an input and produces two files as output:
- schema.json - This file is used by Relay to be able to parse the fragments of the relay queries defined within the components.
- schema.graphql. This file provides a human readable version of the schema.
Below are some of the more important definitions which are a part of the schema in schema.graphql. First, the object type itself:
type Ensayo implements Node {
  id: ID!
  Ensayo_Title: String
  Ensayo_Description: String
  Ensayo_Content: String
}
In addition to the object type, GraphQL and Relay use edges and nodes to be able to go through lists of essays for a certain user. These will not be discussed here, but are required for the functioning of the entire system:
type EnsayosEdge {
  node: Ensayo
  cursor: String!
}

type Viewer implements Node {
  id: ID!
  ....
  Ensayos(after: String, first: Int, before: String, last: Int): EnsayosConnection
  Ensayo(id: ID): Ensayo
  ....
}
The GraphQL.js reference implementation requires that we define a class for every type that will be served through the queries.
export default class Ensayo
{
  constructor( fields )
  {
    this.id = fields.id;
    this.Ensayo_User_id = fields.Ensayo_User_id;
    this.Ensayo_Title = fields.Ensayo_Title;
    this.Ensayo_Description = fields.Ensayo_Description;
    this.Ensayo_Content = fields.Ensayo_Content;
  }
}
Ensayo storage in Cassandra
In order to persist the essays in Cassandra, a table is used with the three fields for title, description and content. In addition to it, the unique ID is stored, as well as an ID of the user to who the essay belongs.
CREATE TABLE "Ensayo"(
  id uuid PRIMARY KEY,
  "Ensayo_User_id" uuid,
  "Ensayo_Title" varchar,
  "Ensayo_Description" varchar,
  "Ensayo_Content" varchar,
);
The ID fields in Relay are represented as uuid in Cassandra. Here is an example of an insert statement with a sample essay:
insert into "Ensayo"( id, "Ensayo_User_id", "Ensayo_Title", "Ensayo_Description", "Ensayo_Content" )
values( fa666f10-483d-43bd-8ee2-4e4921c9cf82, 00000000-0000-0000-0000-000000000000,
  'Facebook just taught us all how to build websites',
  'Overview of the advantages of Relay over previous approaches focusing on the components declaring
  their data needs and use of GraphQL.',
  'In 2003, Brad Fitzpatrick released Memcached, and began talking about LiveJournal architecture.
  This became the prototype for the next generation of sites and apps, and is still largely the same
  way web apps are built today.
  https://blog.gyrosco.pe/facebook-just-taught-us-all-how-to-build-websites-51f1e7e996f2#.m7sk5nj5q'
 );
URL and routing
In an isomorphic application we set up our routes in routes.js. In the isomorphic application the routes are set in a JavaScript object which is used both for the server-side routing with express and client-side routing with react router. This is explained in more detail in Isomorphic React Relay.
{
  path: 'Ensayo_PublicListing',
  indexRoute: {
    component: Ensayo_PublicListing,
    queries: ViewerQueries,
  },
  childRoutes: [
    {
      path: ':id',
      component: Ensayo_PublicItem,
      queries: ViewerQueries,
    },
  ],
},
Here is a URL for an article:
http://universal-relay-boilerplate.herokuapp.com/Ensayo_PublicListing/RW5zYXlvOmZhNjY2ZjEwLTQ4M2QtNDNiZC04ZWUyLTRlNDkyMWM5Y2Y4Mg==
Relay data definition
In order to get data for a React component using Relay, we place it in a Relay container. In this case the component is Ensayo_PublicItem. The Relay container will define the Relay query fragment used to retrieve the data. The exported entry is the container that wraps the component:
export default Relay.createContainer( Ensayo_PublicItem, {

  initialVariables:
  {
    id: null,
  },

  prepareVariables( { id } )
  {
    return { id, };
  },

  fragments: {
    Viewer: () => Relay.QL`
      fragment on Viewer {
        Ensayo(id:$id){
          id,
          Ensayo_Title,
          Ensayo_Description,
          Ensayo_Content,
        }
        User_IsAnonymous,
      }
    `,
  },
});
- The 'initialVariables' section defines variables that will be used in the Relay query fragment. It can be a some kind of search criteria, or in our case, an ID uniquely identifying the essay.
- The
prepareVariablessection maps the input variables to the variables used in the Relay query fragment. - The 'fragments' section defines one or more fragments that will be used by Relay to compose the query sent to the GraphQL server, that will retrieve the data required by the component.
Whenever new components are created, Relay will collect the query fragments from all containers and compose them into one query. Here is the resuling query for the fragment above, when no other fragments are included in the query:
{
  "query" : "query ViewerQueries{ Viewer{ id,...F0 } } fragment F0 on
  Viewer{
    _EnsayouU8EA:Ensayo(
      id:\"RW5zYXlvOmZhNjY2ZjEwLTQ4M2QtNDNiZC04ZWUyLTRlNDkyMWM5Y2Y4Mg==\"
    )
    {
      id,
      Ensayo_Title,
      Ensayo_Description,
      Ensayo_Content
    },
    id
  }",
  "variables": { }
}
Displaying Essay content
The component rendering the essay is fairly strightforward. The data in the component is placed in
this.props.Viewer.Ensayo
since our fragment in the Relay container was called Viewer, and we requested an essay by ID on the viewer.
In the rendering of the component, the H1 will be set to the title, and the H2 will be set to the description. Those tags are important to search engines:
let contentH1 = this.props.Viewer.Ensayo.Ensayo_Title.substring( 0, 100 );
let contentH2 = this.props.Viewer.Ensayo.Ensayo_Description.substring( 0, 100 );

return (
  <div>
    ...
    <Card>
      <CardHeader
        title={ <h1 style={ { fontSize: 15 } }>{ contentH1 }</h1> }
        subtitle={ <h2 style={ { fontSize: 14, fontWeight: 'normal' } }>{ contentH2 }</h2> }
      />
      <CardText>
        { this.props.Viewer.Ensayo.Ensayo_Content }
      </CardText>
    </Card>
  </div>
);
Configuring Helmet
In addition to the content visible on the page in the H1 and H2 elements and the card text, we will use the title to populate the page title and the description to populate the description meta field. Helmet is used to populate those values:
<Helmet
  title={ this.props.Viewer.Ensayo.Ensayo_Title }
  meta={ [
    { name: "description", content: this.props.Viewer.Ensayo.Ensayo_Description },
  ] }
/>
In a real application, the title and the description will most probably be different from the H1 and H2 tags. In this example they are retrieved from the same source for simplicity. Notice that the source of the data is the same props retrieved by Relay.
Translating from external ID to internal ID
Relay used ID values comprised of the entity name, and the internal ID value, and encoded. For instance, the external ID
RW5zYXlvOmZhNjY2ZjEwLTQ4M2QtNDNiZC04ZWUyLTRlNDkyMWM5Y2Y4Mg==
corresponds to internal UUID:
fa666f10-483d-43bd-8ee2-4e4921c9cf82
for type Ensayo. Notice that including the type in the ID makes all external IDs unique. In this example the external ID is used as part of the URL. In a real works scenario the URL would consist of words relative to the essay, for instance part of the article title, separated by dashes.
View template
When a page is requred by URL directly from the server, either by a search engine, or by the user in a browser, the server rendering is performing using EJS templates. This is performed in renderOnServer.js. At first the data for the template are retieved. The Helmet component is responsible for the title, metadata and link tags. In our case only the title and the meta are used, but the link is added anyway for complempleteness. The template is passed the data in the following way:
.........

const helmet = Helmet.rewind( );

.........

res.render( path.resolve( __dirname, '..', 'webapp', 'renderOnServer.ejs' ), {
    preloadedData: JSON.stringify(data),
    assetsPath: assetsPath,
    reactOutput,
    title: helmet.title,
    meta: helmet.meta,
    link: helmet.link,
    isomorphicVars: isoVars,
    NODE_ENV: process.env.NODE_ENV,
} );
The view template itself simply includes the tags in the head in webapp/views/renderOnServer.ejs:
<!doctype html>
<html lang="en">
<head>

  <%- title %>

  <meta charset="utf-8">
  <meta http-equiv="X-UA-Compatible" content="IE=edge">
  <meta name="viewport" content="width=device-width, target-densitydpi=device-dpi,
    initial-scale=1.0, maximum-scale=1.0, user-scalable=no">

  <%- meta %>

  <link href='http://fonts.googleapis.com/css?family=Roboto' rel='stylesheet' type='text/css'>
  <link rel="stylesheet" href="<%- assetsPath %>/app.css">

  <%- link %>

</head>
<body style="font-family: 'Roboto', sans-serif; margin: 0px; font-size: 13px; line-height: 20px;">
  <script>window.isomorphicVars = <%- isomorphicVars %></script>
  <script>window.process = { env: { NODE_ENV: '<%- NODE_ENV %>' } }</script>
  <div id="root"><%- reactOutput %></div>
  <script id="preloadedData" type="application/json"><%- preloadedData %></script>
  <script src="<%- assetsPath %>/app.js"></script>
</body>
</html>
The final product
Content delivered to Search Engines
In order to see exactly what the search engines, and as a matter of fact a browser when it requests the initial page, we will use the curl command and request the page by URL:
$ curl http://universal-relay-boilerplate.herokuapp.com/Ensayo_PublicListing/RW5zYXlvOmZhNjY2ZjEwLTQ4M2QtNDNiZC04ZWUyLTRlNDkyMWM5Y2Y4Mg==
Here is the result:
<!doctype html>
<html lang="en">
<head>

  <title data-react-helmet="true">Facebook just taught us all how to build websites</title>

  ...

  <meta data-react-helmet="true" name="description"
    content="Overview of the advantages of Relay over previous approaches focusing on the components declaring their data
    needs and use of GraphQL."
  />

  ...

</head>
<body .......

<h1 style="font-size:15px;" data-reactid=".233z6bkk0lc.$=13.0.1.0.$=10.1.0.0">
  Facebook just taught us all how to build websites
</h1>
</span><span style="color:rgba(0, 0, 0, 0.54);display:block;font-size:14px;" data-reactid=".233z6bkk0lc.$=13.0.1.0.$=10.1.1">
  <h2 style="font-size:14px;font-weight:normal;" data-reactid=".233z6bkk0lc.$=13.0.1.0.$=10.1.1.0">
    Overview of the advantages of Relay over previous approaches focusing on the components declaring th
  </h2>
</span>

.........

In 2003, Brad Fitzpatrick released Memcached, and began talking about LiveJournal architecture. This became the prototype
for the next generation of sites and apps, and is still largely the same way web apps are built today.
https://blog.gyrosco.pe/facebook-just-taught-us-all-how-to-build-websites-51f1e7e996f2#.m7sk5nj5q
.........

<script src="/assets/0.8.24/app.js"></script>

</body>
</html>
In the head section we see the two values that were produced by Helmet. Notice the data-react-helmet="true" attributes. Helmet will use those to update the head once the application continues to work as a SPA:
<title data-react-helmet="true">Facebook just taught us all how to build websites</title>
<meta data-react-helmet="true" name="description"
  content="Overview of the advantages of Relay over previous approaches focusing on the components
  declaring their data needs and use of GraphQL."
/>
Navigation within SPA
Once the initial page is loaded as HTML rendered on the server, the application continues to work as an ordinary SPA. Here is a screenshot of the Chrome developer tools upon loading the initial page with the essay before any kind of interaction from the user. The title and description are clearly visible. Notice the position of the description - it is in between the other tags, as per the EJS template above:
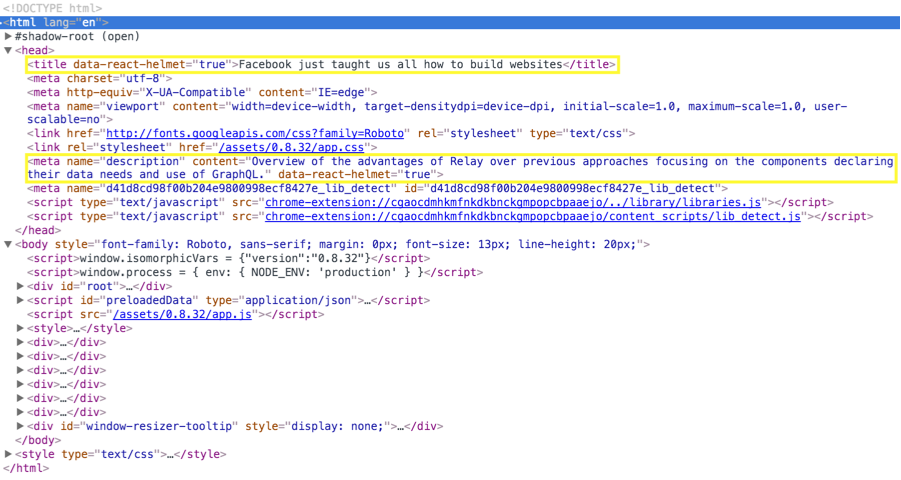
When the user navigates to the home page the title is updated, and the description is updated too:
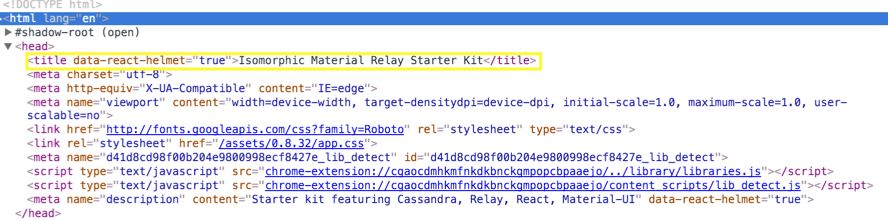
This is because the main page of the application has the following configuration for Helmet:
<AppCanvas>
  <Helmet
    title="Isomorphic Material Relay Starter Kit"
    meta={ [
      { name : "description", content: "Starter kit featuring Cassandra, Relay, React, Material-UI" },
    ] }
  />
  ...
</AppCanvas>
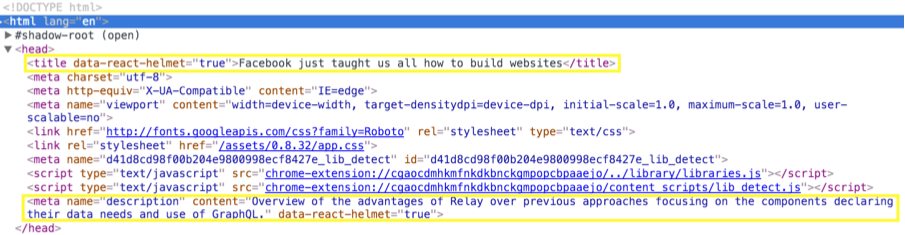
When the user navigates back to the essay page, the title and the description are back to their initial values:
Testing with an SEO tool
Below is the result displayed by the SEO Centro analyzer testing tool.
