Login Using Social Networks
This section applies to Rebar only.
The setup steps closely follow the following tutorials:
Introduction
The unit for Login Using Social Networks allows users to log in using a social network like Facebook instead of creating an account with user name and password. The units adds login buttons to the bottom of the login dialog:

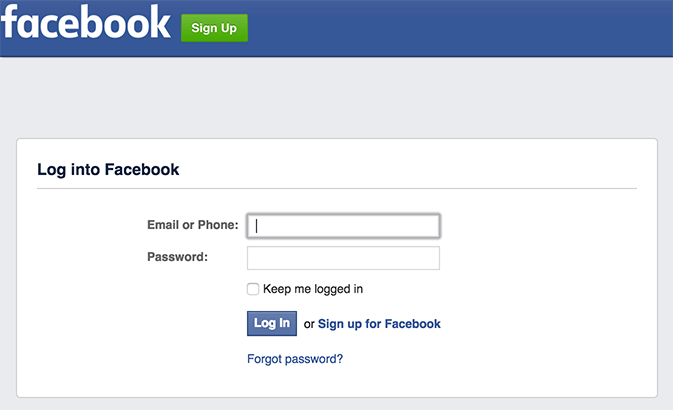
The user can still proceed with the user name and password, or create a new account as usual. However, if the user chooses any of the social network login buttons, the user will be redirected to the social network confirmation page. It looks, in the case of Facebook, like this:
Once the user logs in, or if the user is already logged in to the social network, the Rebar application will be loaded again. If a user account has already been created for the user of the social network, the user will be logged into the existing account. Otherwise, new account will be created and the user will be logged in, as if they used user name and password.
TODO provide example of what the login on mobile looks like.
Configuration
In /configuration/server/authExtensions.js import and re-export the authentication extensions from rb-social-login:
import authExtensions from '../../units/rb-social-login/server/authExtensions'

export default authExtensions;
In /configuration/webapp/components/AccountManagementExtensions.jsx import and re-export the accunt management extensions from rb-social-login:
import {ExtensionsForLogIn, ExtensionsForCreateUser} from '../../../units/rb-social-login/components/AccountManagementExtensions.jsx'

export { ExtensionsForLogIn, ExtensionsForCreateUser }
In configuration/units/rb-social-login/webapp/socialNetworkButtons.js specify the buttons for social login to be displayed. They are included from the social network-specific units, and be placed in an array in the order they are expected to appear on the screen. Here is an example:
import LoginButtonFacebook from '../../../../units/rb-social-login-facebook/webapp/LoginButtonFacebook'
import LoginButtonGoogle from '../../../../units/rb-social-login-google/webapp/LoginButtonGoogle'
import LoginButtonLinkedIn from '../../../../units/rb-social-login-linkedin/webapp/LoginButtonLinkedIn'
import LoginButtonTwitter from '../../../../units/rb-social-login-twitter/webapp/LoginButtonTwitter'

export default [LoginButtonFacebook, LoginButtonGoogle, LoginButtonLinkedIn, LoginButtonTwitter]
For the server configuration, corresponding changes have to be implemented in two configuration files.
In configuration/units/rb-social-login/server/createPassportStrategies.js specify the creation function for the passport strategies. In this case the order is unimportant:
import createPassportStrategyFacebook from '../../../../units/rb-social-login-facebook/server/createPassportStrategyFacebook'
import createPassportStrategyGoogle from '../../../../units/rb-social-login-google/server/createPassportStrategyGoogle'
import createPassportStrategyLinkedIn from '../../../../units/rb-social-login-linkedin/server/createPassportStrategyLinkedIn'
import createPassportStrategyTwitter from '../../../../units/rb-social-login-twitter/server/createPassportStrategyTwitter'

export default [
  createPassportStrategyFacebook,
  createPassportStrategyGoogle,
  createPassportStrategyLinkedIn,
  createPassportStrategyTwitter,
]
In configuration/units/rb-social-login/server/registerAuthEndpoints.js specify the includes that will register the authentication endpoints:
import registerAuthEndpointsFacebook from '../../../../units/rb-social-login-facebook/server/registerAuthEndpointsFacebook'
import registerAuthEndpointsGoogle from '../../../../units/rb-social-login-google/server/registerAuthEndpointsGoogle'
import registerAuthEndpointsLinkedIn from '../../../../units/rb-social-login-linkedin/server/registerAuthEndpointsLinkedIn'
import registerAuthEndpointsTwitter from '../../../../units/rb-social-login-twitter/server/registerAuthEndpointsTwitter'

export default [
  registerAuthEndpointsFacebook,
  registerAuthEndpointsGoogle,
  registerAuthEndpointsLinkedIn,
  registerAuthEndpointsTwitter,
]
Configuration of accounts
In order to be able to use a social network for authentication, an application account needs to be created in this social network. This account contains application ID and secret that needs to be entered in .env.
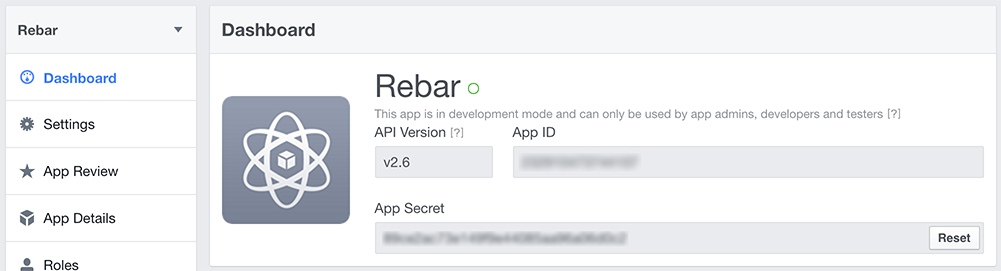
In https://developers.facebook.com/apps/ either create your new application or choose your existing application.
Gather the App ID and App Secret from the application dashboard:
In the site configuration specify:
const siteInformation = {
  // ...
  configurationAsObject: {
    // ...
    serverData: {
      rb_social_login: {
        // ...
        facebook: {
          app_id: '<value from App ID field above>',
          app_secret: '<value from App Secret field above>',
        },
      },
    },
  },
}
For testing on a local machine in settings, Website, site URL, specify localhost, or, alternatively for production, the production URL:

In order to set up a new application with Google:
- Follow https://developers.google.com/identity/sign-in/web/devconsole-project.
- From API Manager, enable "Google+ API".
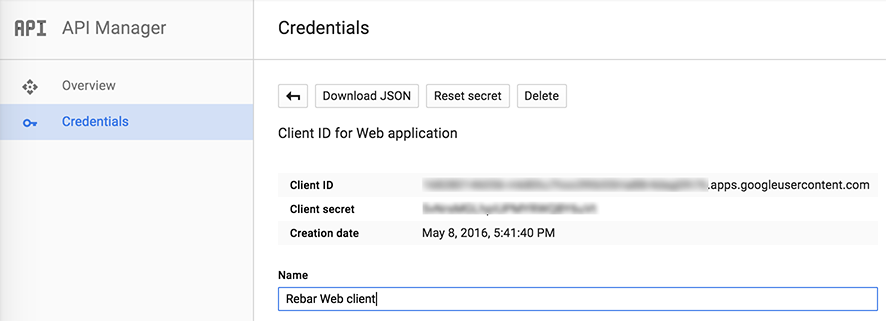
In order to configure the google application for authentication within Rebar, open the API manager from https://console.developers.google.com/iam-admin/projects, choose the API and view 'Credentials':
In the site configuration specify:
const siteInformation = {
  // ...
  configurationAsObject: {
    // ...
    serverData: {
      rb_social_login: {
        // ...
        google: {
          client_id: '<value of Client ID from above>',
          client_secret: '<value of Client secret from above>',
        },
      },
    },
  },
}
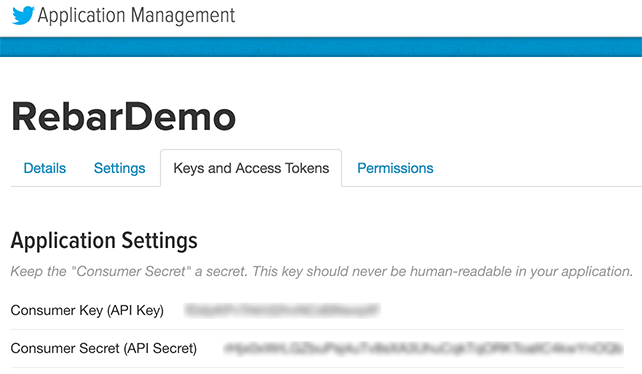
Create a new app or use existing twitter app at https://apps.twitter.com/. Gather the credentials from the 'Keys and access tokens' section:
In the site configuration specify:
const siteInformation = {
  // ...
  configurationAsObject: {
    // ...
    serverData: {
      rb_social_login: {
        // ...
        twitter: {
          consumer_key: '<value of Consumer Key (API Key) from above>',
          consumer_secret: '<value of Consumer Secret (API Secret) from above>',
        },
      },
    },
  },
}
Yahoo!
The configuration for Yahoo! is similar to the ones listed above.
The configuration for Linked In is similar to the ones listed above.
Native App Setup
iOS App
Add the Facebook SDK to XCode project:
- If you don't have a
Frameworksgroup in your project, create one. - Open
~/Documents/FacebookSDKusing Finder. - Drag the files indicated in the list below into the
Frameworksgroup of Xcode's Project Navigator. In the displayed dialog, chooseCreate groupsand deselectCopy items if needed. This references the SDK where you installed it rather than copying the SDK into your app.Bolts.frameworkFBSDKCoreKit.frameworkFBSDKLoginKit.frameworkFBSDKShareKit.framework
- In XCode's
Build Settingstab for the project, add~/Documents/FacebookSDKto the project'sFramework Search Paths.
- If you don't have a
In
/ios/[---project name---]/Info.plistadd the following:
<?xml version="1.0" encoding="UTF-8"?>
<!DOCTYPE plist PUBLIC "-//Apple//DTD PLIST 1.0//EN" "http://www.apple.com/DTDs/PropertyList-1.0.dtd">
<plist version="1.0">
  <dict>
    ...
    <key>CFBundleURLTypes</key>
    <array>
      <dict>
        <key>CFBundleURLSchemes</key>
        <array>
          <string>fb[---Facebook App ID---]</string>
        </array>
      </dict>
    </array>
    ...
    <key>FacebookAppID</key>
    <string>[---Facebook App ID---]</string>
    <key>FacebookDisplayName</key>
    <string>[--- Display name of your project in Facebook ---]</string>
    <key>LSApplicationQueriesSchemes</key>
    <array>
      <string>fbapi</string>
      <string>fb-messenger-api</string>
      <string>fbauth2</string>
      <string>fbshareextension</string>
    </array>
    <key>NSPhotoLibraryUsageDescription</key>
      <string>[--- human-readable reason for photo access ---]</string>    ...
  </dict>
<plist>
- In
/ios/[---project name---]/AppDelegate.madd the following:
// ...

#import <FBSDKCoreKit/FBSDKCoreKit.h>

// ..

- (BOOL)application:(UIApplication *)application didFinishLaunchingWithOptions:(NSDictionary *)launchOptions
{
  [[FBSDKApplicationDelegate sharedInstance] application:application
          didFinishLaunchingWithOptions:launchOptions
  ];

  // ...
}

- (BOOL)application:(UIApplication *)application openURL:(NSURL *)url
  sourceApplication:(NSString *)sourceApplication annotation:(id)annotation {

  BOOL handled = [[FBSDKApplicationDelegate sharedInstance] application:application
          openURL:url
          sourceApplication:sourceApplication
          annotation:annotation
  ];
  // Add any custom logic here.
  return handled;
}

// ...
Android App
- In
/android/app/src/main/AndroidManifest.xmlinmainfest/application/add the following:
<manifest ...>
  <application ...>
    <meta-data android:name="com.facebook.sdk.ApplicationId" android:value="@string/facebook_app_id"/>
</manifest>
- In
/android/app/src/main/java/com/[---project name---]/MainActivity.javaspecify the use of the FBSDK package:
// ...
import android.content.Intent;
import com.facebook.reactnative.androidsdk.FBSDKPackage;
// ...

public class MainActivity extends ReactActivity {

  @Override
  public void onActivityResult(int requestCode, int resultCode, Intent data) {
      super.onActivityResult(requestCode, resultCode, data);
      MainApplication.getCallbackManager().onActivityResult(requestCode, resultCode, data);
  }

  // ...
}
- In
/android/app/src/main/java/com/[---project name---]/MainApplication.javamake the following changes:
// ...
import com.facebook.CallbackManager;
import com.facebook.reactnative.androidsdk.FBSDKPackage;
// ...
public class MainApplication extends Application implements ReactApplication {

  private static CallbackManager mCallbackManager = CallbackManager.Factory.create();

  protected static CallbackManager getCallbackManager() {
    return mCallbackManager;
  }
  @Override
  public void onCreate() {
  // ...
}
- In
/android/app/build.gradleadd the following:
...
dependencies {
    ...
    compile 'com.facebook.android:facebook-android-sdk:4.+'
}
- In
/android/app/src/main/res/values/strings.xmladd the following:
<resources>
    ...
    <string name="facebook_app_id">[---Facebook App ID---]</string>
</resources>
XXX Review https://developers.facebook.com/docs/android/getting-started for more instructions