Push Notifications
This section applies to Rebar only.
The setup steps closely follow the following tutorials:
- Setting up Push Notifications with React Native.
- Push Notification Sample App from Parse.
- Set Up a Firebase Cloud Messaging Client App on Android.
Configuration
In .env specify:
PUSH_NOTIFICATIONS_PRODUCTION=true
or
PUSH_NOTIFICATIONS_PRODUCTION=false
to indicate whether the push notifications are configured for development or production.
Backend Setup for iOS
Creating an Explicit App ID
Every application installed on your device needs an App ID. As a convention, these are represented by reversed addresses (ex. com.example.MyParsePushApp). In order to support Push Notifications, your app must use an Explicit App ID.
In order to create a new Explicit App ID, do the following:
- In the Apple Developer Member Center, navigate to Certificates, Identifiers & Profiles, then navigate to Identities.
- Using the + button add a new App ID. Make sure to choose Explicit App ID.
- It is recommended that the Bundle ID uses a reverse-domain name style string (i.e., com.domainname.appname). This string should match the Bundle Identifier in your Xcode project configuration or Info.plist file:
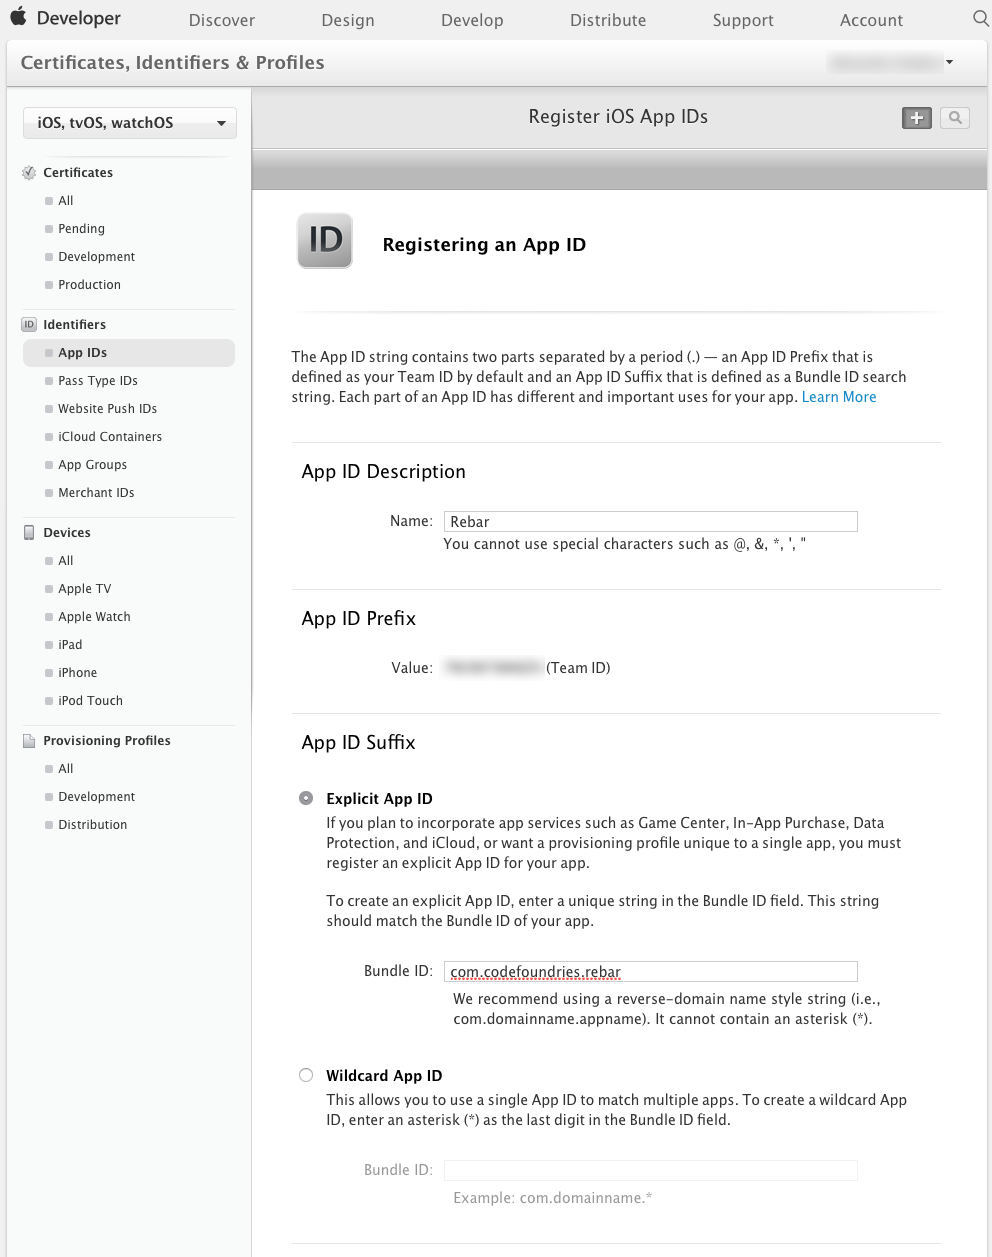
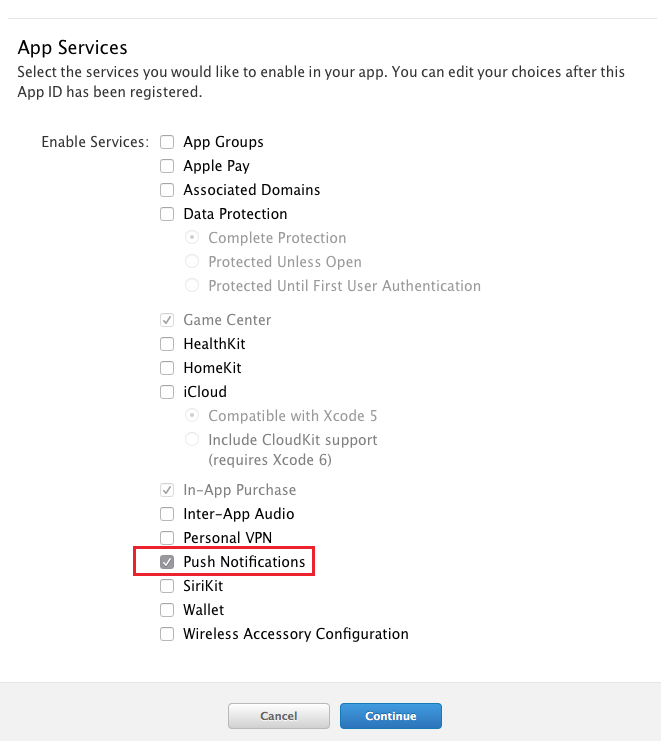
- Enable Push Notifications under App Services. You should also enable any other services that your app needs:
Configuring Push Notifications
Choose the newly created App ID from the list and select Edit, then scroll to the Push notifications section:
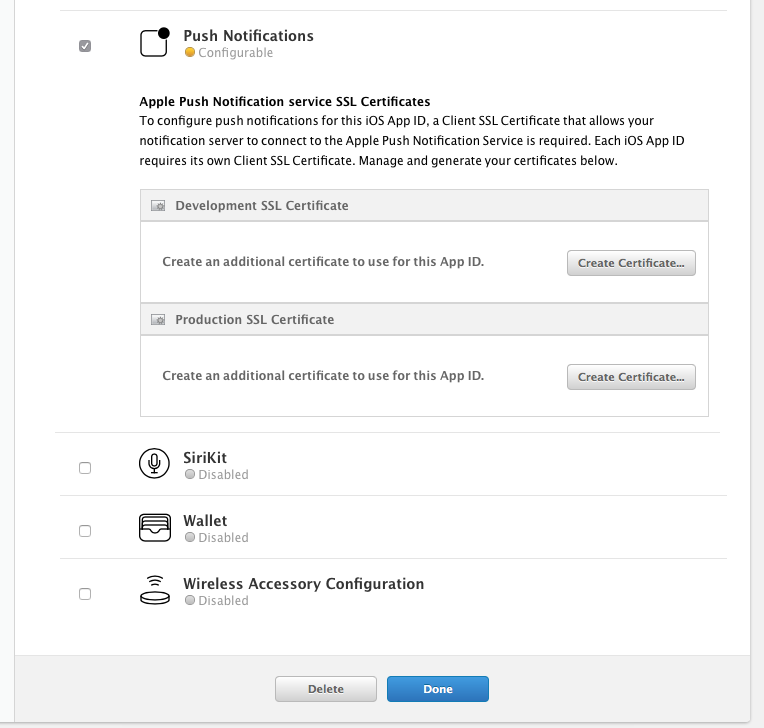
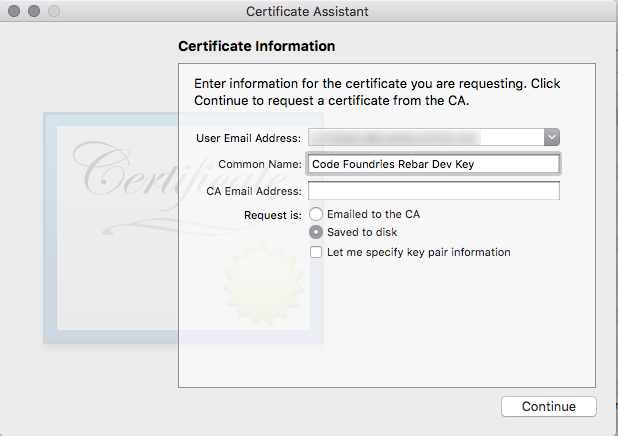
Start by selecting Create Certificate under Development SSL Certificate. Then follow the instructions in the next screen to create a Certificate Signing Request (CSR) using the Keychain Access utility on your Mac. This will be used to authenticate the creation of the SSL certificate:
In the Applications folder on your Mac, open the Utilities folder and launch Keychain Access.
Within the Keychain Access drop down menu, select Keychain Access > Certificate Assistant > Request a Certificate from a Certificate Authority.
- In the Certificate Information window, enter the following information:
- In the User Email Address field, enter your email address.
- In the Common Name field, create a name for your private key for instance
Code Foundries Rebar Dev Key. - The CA Email Address field should be left empty.
- In the Request is group, select the Saved to disk option.
- Click Continue within Keychain Access to complete the CSR generating process.
Then Locate the CSR and upload it to Apple's servers, then click on Generate. Once the certificate is ready, download the generated SSL certificate to your Mac and save it as apns-dev.crt (or apns-prod.crt for production). This file will be used later in the process.
Once you download the certificate:
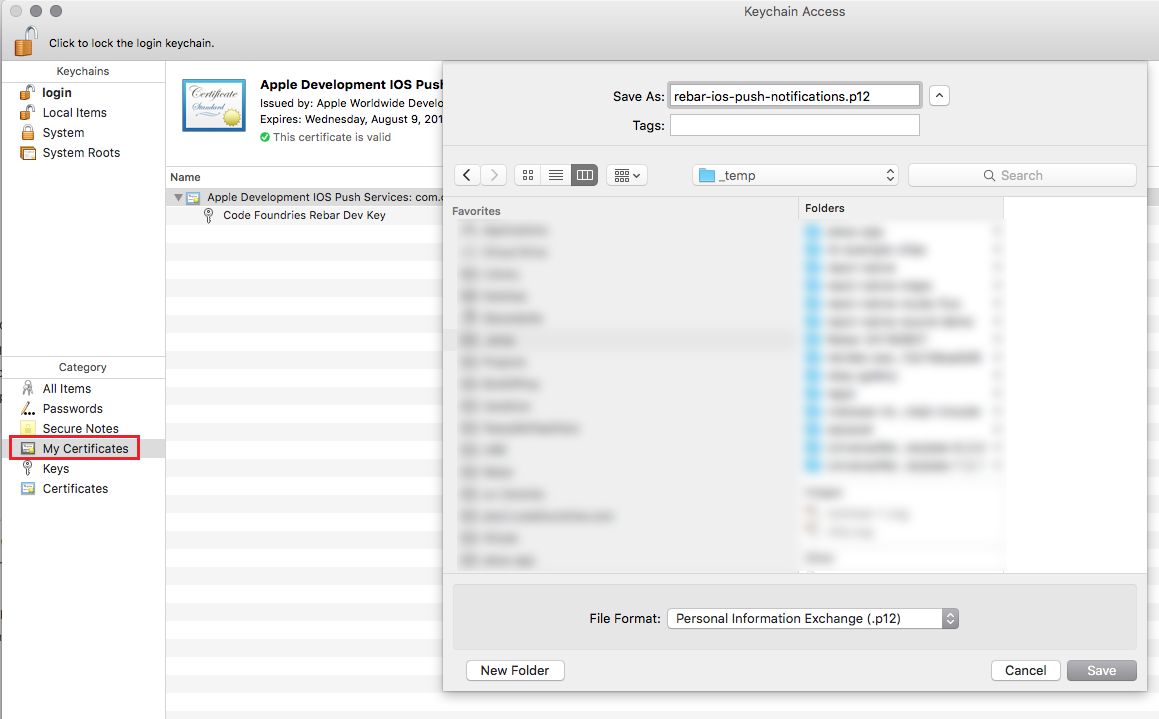
- Double click on the downloaded SSL certificate to add it to your login keychain.
- Open the Keychain Access utility.
- Locate the certificate you just added under My Certificates. It should be called Apple Development Push Services: if it is a development certificate, or Apple Push Services: if it is a production certificate.
- Right-click on it, select Export, and save it as a
apns-dev.p12(orapns-prod.p12for production). You will be prompted to enter a password which will be used to protect the exported certificate. Do not enter an export password when prompted! Leave both fields blank and click OK. You will then be asked to enter your OS X account password to allow Keychain Access to export the certificate from your keychain on the next screen. Enter your OS X password and click on Allow. If the Personal Information Exchange (.p12) option is grayed out in the export sheet, make sure My Certificates is selected in Keychain Access.
Creating a provisioning profile
In order to run an app on an iOS device, a provisioning profile is required. Following the next steps to create it:
- In the Apple Developer Portal, navigate to Provisioning Profiles.
- Use the plus button to add a new profile.
- Choose iOS App Development for Development and App Store for Distribution.
- Choose the App ID you previously created.
- Select your development certificate.
- Give a name to the profile.
- Download and install the profile.
Setting up Apple Push Notification Service on the server
In the folder where the files apns-dev.cer and apns-dev.p12 created previously are saved, run the following commands:
openssl x509 -in apns-dev.cer -inform DER -outform PEM -out apns-cert-dev.pem
openssl pkcs12 -in apns-dev.p12 -out apns-key-dev.pem -nodes
or, alternatively for production:
openssl x509 -in apns-prod.cer -inform DER -outform PEM -out apns-cert-prod.pem
openssl pkcs12 -in apns-prod.p12 -out apns-key-prod.pem -nodes
When challenged with Enter Import Password press Enter. As a result, two files should be created:
apns-cert-dev.pemapns-key-dev.pem
or, for production:
apns-cert-prod.pemapns-key-prod.pem
Copy those to configuration/units/rb-push-notifications/server/.
Additional APNS configuration
- Acquire your Apple Team ID from the Membership section. Store it in your
.envfile underXXX where is the team ID stored?
iOS App
- In
/ios/[---project name---]/AppDelegate.madd the following:
// ...
#import "RCTPushNotificationManager.h"
// ..

- (BOOL)application:(UIApplication *)application didFinishLaunchingWithOptions:(NSDictionary *)launchOptions
{
  // ...
}

// ...


// Required to register for notifications
- (void)application:(UIApplication *)application didRegisterUserNotificationSettings:(UIUserNotificationSettings *)notificationSettings
{
  [RCTPushNotificationManager didRegisterUserNotificationSettings:notificationSettings];
}
// Required for the register event.
- (void)application:(UIApplication *)application didRegisterForRemoteNotificationsWithDeviceToken:(NSData *)deviceToken
{
  [RCTPushNotificationManager didRegisterForRemoteNotificationsWithDeviceToken:deviceToken];
}
// Required for the notification event.
- (void)application:(UIApplication *)application didReceiveRemoteNotification:(NSDictionary *)notification
{
  [RCTPushNotificationManager didReceiveRemoteNotification:notification];
}
// Required for the localNotification event.
- (void)application:(UIApplication *)application didReceiveLocalNotification:(UILocalNotification *)notification
{
  [RCTPushNotificationManager didReceiveLocalNotification:notification];
}
- (void)application:(UIApplication *)application didFailToRegisterForRemoteNotificationsWithError:(NSError *)error
{
  NSLog(@"%@", error);
}

// ...
In XCode, remove
RNFIRMessaging.xcodeprojfrom the list of libraries in the project.Add push notifications iOS
- Add the follwoing to your Project:
node_modules/react-native/Libraries/PushNotificationIOS/RCTPushNotification.xcodeproj - Add the follwing to
Link Binary With Libraries:libRCTPushNotification.a - Add the following to your
Header Search Paths:$(SRCROOT)/../node_modules/react-native/Libraries/PushNotificationIOSand set the search torecursive
- Add the follwoing to your Project:
Backend Setup for Android and Web
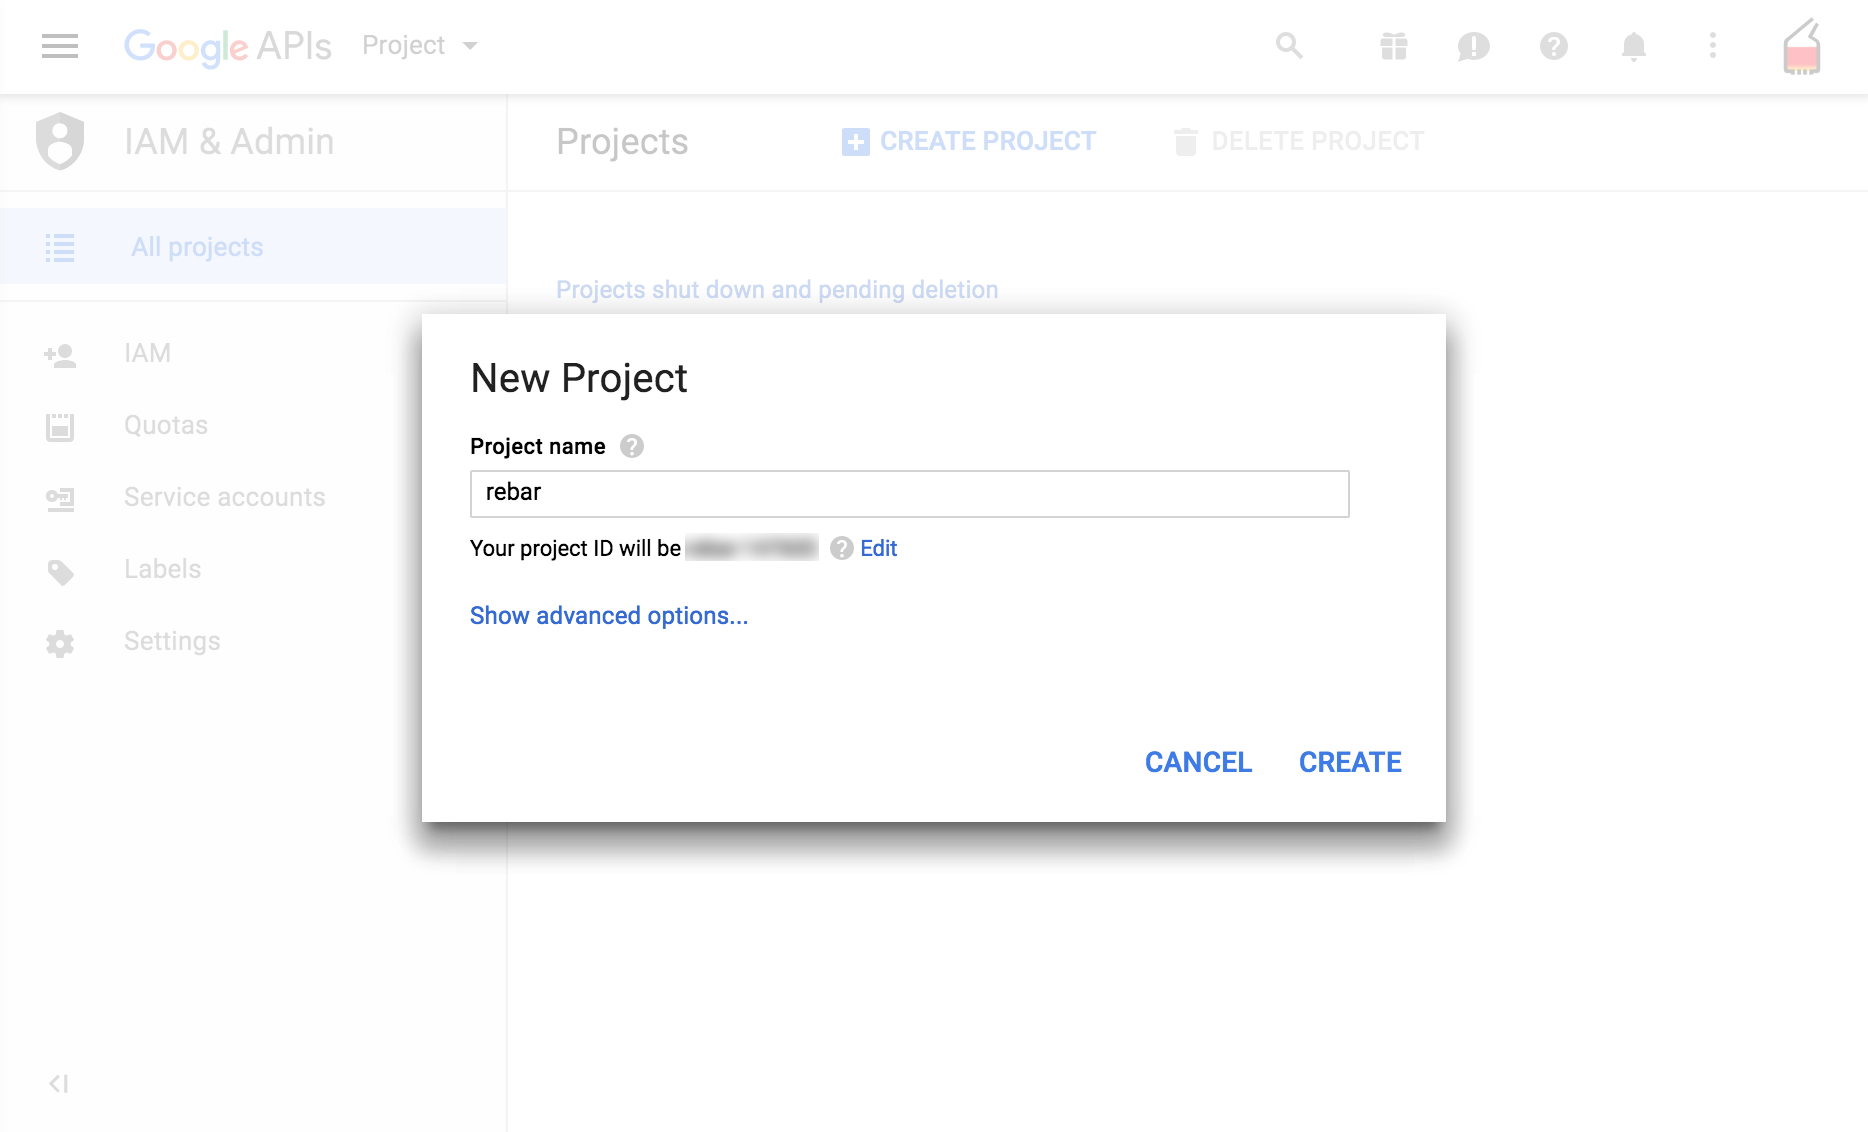
- Create a new project, or use an existing one in IAM & Admin Projects Section:
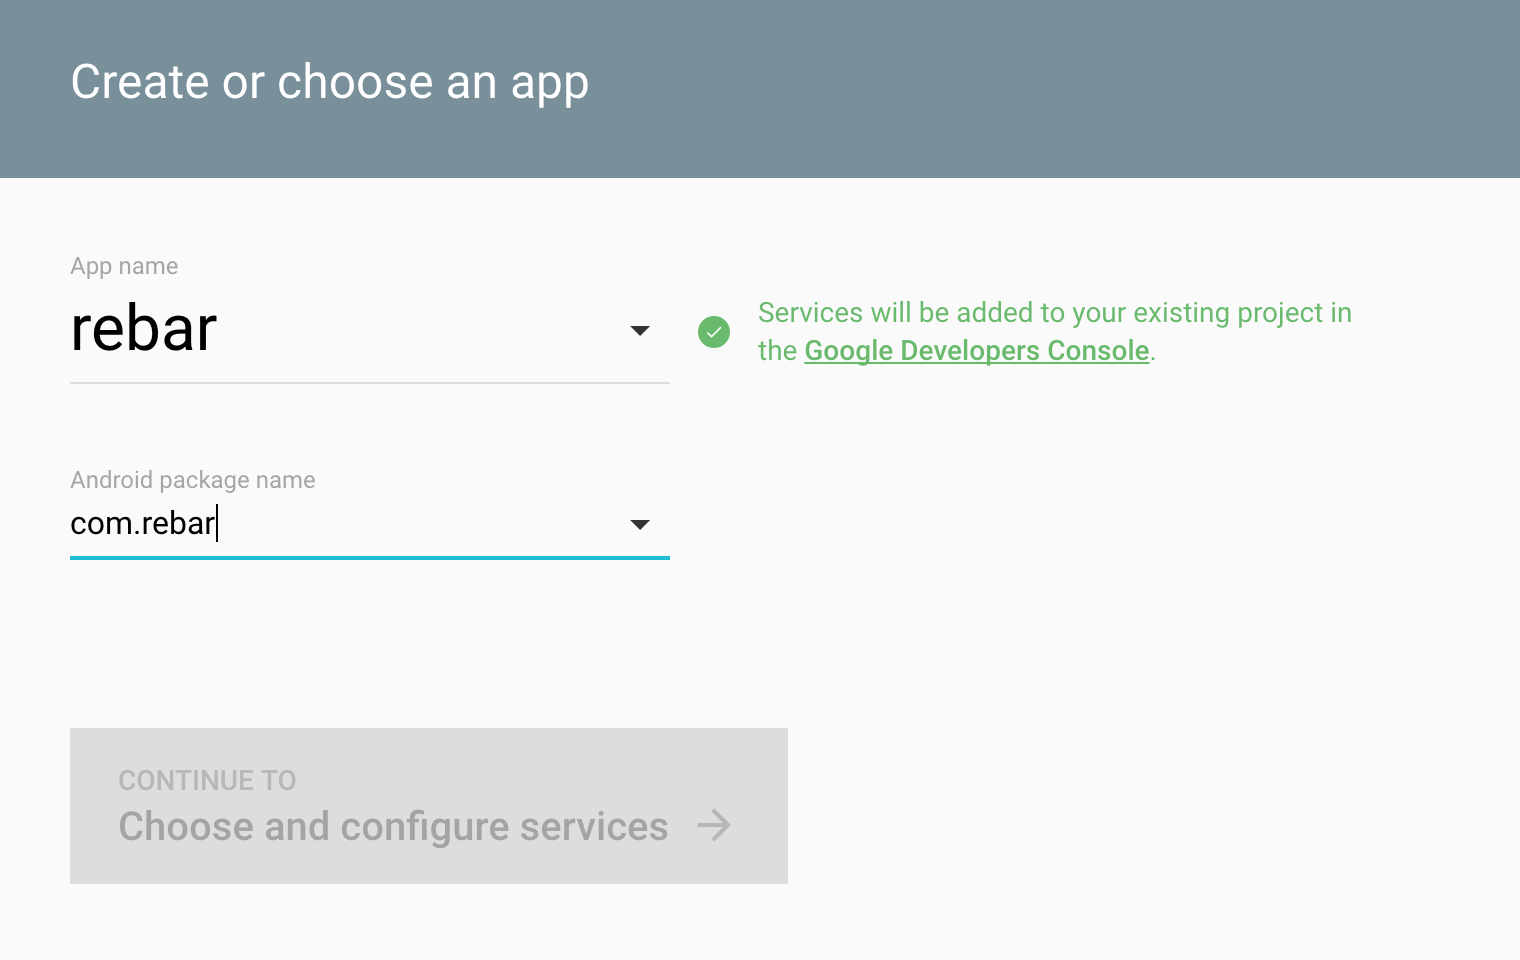
- To add Google Cloud Messaging go to Mobile Add:
- Choose "Android App".
- Specify the project name and the package name as it is in
Androidmanifest.xml:
  <manifest xmlns:android="http://schemas.android.com/apk/res/android"
      package="com.rebar"
      android:versionCode="1"
      android:versionName="1.0">
      ...
- Choose "Cloud Messaging". After adding cloud messaging you will be shown the
Sender IDand theServer API Key:
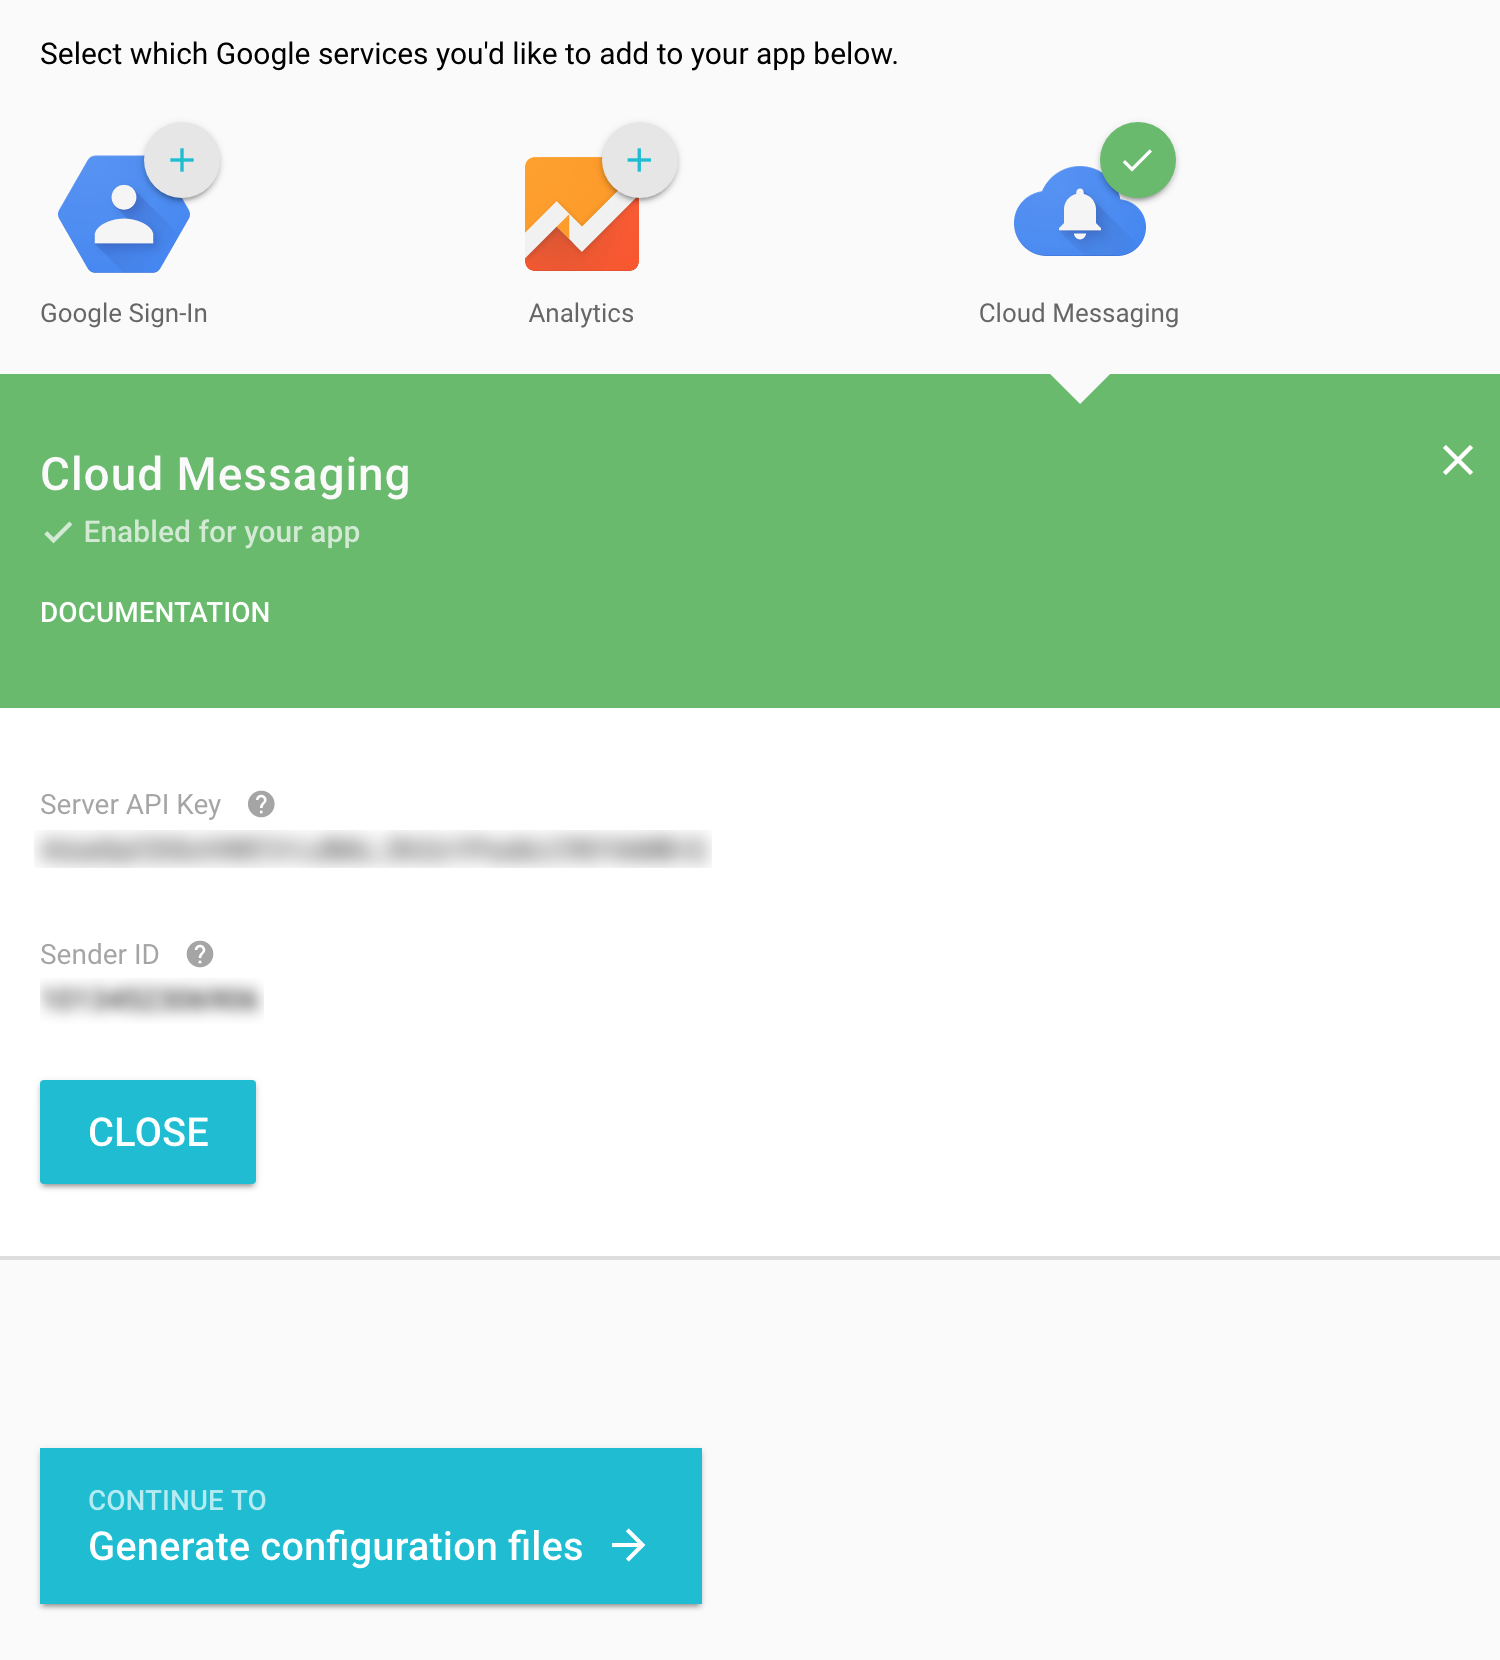
- Place the
Sender IDin/configuration/units/rb-push-notifications/scripts/gcmSenderId.js:
export var gcmSenderId = '123456789012'
- Place the
Server API Keyin/configuration/units/rb-push-notifications/server/gcmApiKey.js:
export var gcmApiKey = 'ABCDEFGHKLMNQWERTYU-abc'
- In the next step, as prompted, download
google-services.jsonand place it in/app/android/google-services.json:
{
  "project_info": {
    "project_number": "1234567890",
    "project_id": "yourapp-319617"
  },
  "client": [
    {
      "client_info": {
        "mobilesdk_app_id": "1:1234567890:android:8b1234567890",
        "android_client_info": {
          "package_name": "com.rebar"
        }
      },
      "oauth_client": [],
      "api_key": [
        {
          "current_key": "ABCDEFGHKLMNQWERTYU-abc"
        }
      ],
      "services": {
        "analytics_service": {
          "status": 1
        },
        "appinvite_service": {
          "status": 1,
          "other_platform_oauth_client": []
        },
        "ads_service": {
          "status": 1
        }
      }
    }
  ],
  "configuration_version": "1"
}
In /android/app/src/main/AndroidManifest.xml add the following:
<manifest ... >
  ...
  <application ...>
    ...
    <activity
      android:name=".MainActivity"
      ...
    >
      ...
      <intent-filter>
        <action android:name="codefoundries.action.NOTIFICATION" />
        <category android:name="android.intent.category.DEFAULT" />
      </intent-filter>
    </activity>
    ...
    <service android:name="com.evollu.react.fcm.MessagingService">
      <intent-filter>
        <action android:name="com.google.firebase.MESSAGING_EVENT"/>
      </intent-filter>
    </service>
    <service android:name="com.evollu.react.fcm.InstanceIdService" android:exported="false">
      <intent-filter>
        <action android:name="com.google.firebase.INSTANCE_ID_EVENT"/>
      </intent-filter>
    </service>
  </application>
</manifest>
- In
/android/app/src/main/java/com/[---project name---]/MainApplication.javacomment out or delete:
com.dieam.reactnativepushnotification.ReactNativePushNotificationPackage;

// ...

new ReactNativePushNotificationPackage(),
for instance:
// Should not be included import com.dieam.reactnativepushnotification.ReactNativePushNotificationPackage;

// ...

// Should not be included new ReactNativePushNotificationPackage(),
Also, make the following additional changes (all changes shown combined below):
// ...
import com.evollu.react.fcm.FIRMessagingPackage;
// ...
// Should not be included import com.dieam.reactnativepushnotification.ReactNativePushNotificationPackage;
// ...
This needs to be done after every run of react-native link.
- In
/android/app/build.gradlemake the following changes:
...
dependencies {
    compile 'com.google.firebase:firebase-core:10.0.0'
    compile 'com.google.firebase:firebase-messaging:10.0.0'
    ...
    // Should not be included    compile project(':react-native-push-notification')
    ...
}
XXX Create a task out of this!!!!
Usage
In order to send a push notification to all devices for a user, the sendNotificationToUser function can be used. Here is an example sending a message when a new To Do item is added:
import ObjectManager from '../../../graphql/ObjectManager'
import { sendNotificationToUser } from '../../../units/rb-push-notifications/server/notificationsServer'

export default function serverExtensions( router )
{
  ObjectManager.RegisterTriggerForAdd( 'ToDo', ( objectManager, newToDo ) =>
    sendNotificationToUser( newToDo.ToDo_User_id, newToDo.ToDo_Text +
      ' has been added to your To Do list', '/todo'
    )
  )
}